Step 1: Sign up
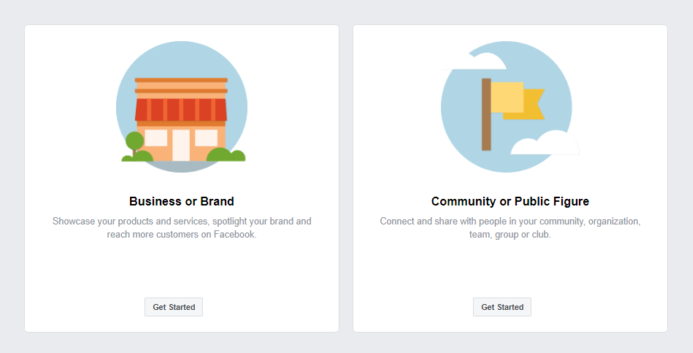
Go to facebook.com/business, click on the drop-down arrow on the top right-hand corner and click Create a Page.
You’ll be prompted to choose your business type; the two options will include business or brand and Community or Public figure.
Select the type that best suits your business.

Now enter your desired business page name and choose a category to describe your page,
then enter your address and phone number and click on Continue.


Step 2: Upload your images
Next, you’ll be asked to upload your profile picture, this would ideally be your business logo.
Click on Upload profile photo and select your image from your PC, then click Next


now upload your cover photo the same way you did for your profile picture.
The ideal dimensions for a Facebook profile picture is 360 x 360 pixels but must be at least 180 x180 pixels.
It is recommended to use the cover photo dimensions of 820 pixels by 360 pixels and should be designed within the safe zones.
It is important to choose a good visual image which aligns with your brand, this will be representing your brand, so choose wisely.
Step 3: Edit the about section
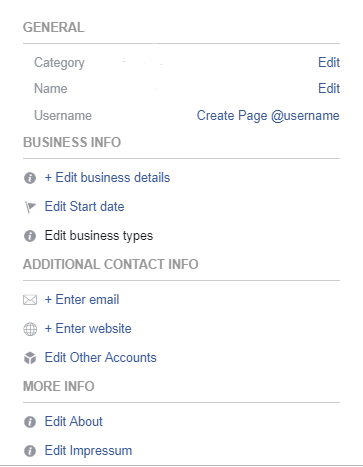
Click on About tab on the left side of the page.


First, we will be creating a unique username for your page. This will allow customers to quickly visit your page or message you. Click on Create Page @username. Enter a username for your page and click Create username. You could use your business name here if you like.
Click on Enter Email and type your email address in the field box and select Save.
Next, enter your website the same way you did your email address, if you do not have one just yet, skip this and move to the next section.
Click on Edit About – here is where you give your customers a brief summary about your business. This is limited to 155 characters so don’t get into get into too much detail. A few sentences explaining what services or products you offer should do the trick.
The Edit Impressum is for certain areas in the world that require a legally mandated statement of the ownership and authorship of a document, which must be included in books, newspapers, magazines and websites published in Germany and a few other German-speaking countries, such as Austria and Switzerland. If you do not reside in these areas just skip this step. Navigate back to the home tab on the left side of the page by clicking on Home.


Step 4: Add your page Button.
Adding a page button allows your customers to take an action on your page, they can book an appointment with you, contact you or purchase your products (if you have a store set up).
To create this, click on the Add a button at the top right-hand side of the page and select what you would like you customer to do. You can choose from the menu, I personally recommend the send message or call now button, this way customers can directly message or call and chat to you regarding their enquiry. Once you have selected your option, click Next, then click Finish.


Step 5. Create your first post
Before inviting people to your new page, make sure you share some information that is beneficial for your customers. Some examples could include product information an upcoming event or you could share the excitement of your accomplishment on creating your new Facebook page!
Step 6. Invite everyone to like your page
You are now ready to invite your friends and family to like your page. To do this navigate to the left of the page and click on community tab.


To invite your entire friends list – on the right side of the page click on See All Friends, then click on Select All next to the “Search in All friends” box. Click Send Invites


If you would like to invite certain individuals only – scroll down the list and select each person, then click Send Invites.
And you’re done! Now you can post interesting content and build up your loyal fan base!

